
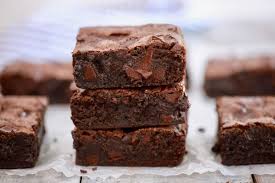
Brownies are a classic dessert beloved by many, known for their rich, chocolatey goodness and delightful texture.
However, for those with gluten sensitivities or celiac disease, enjoying this treat can be challenging.
Fortunately, with the right ingredients and techniques, you can make delicious gluten-free brownies that are just as satisfying as their traditional counterparts.
This guide will take you through an easy, foolproof recipe in six simple steps, ensuring that your brownies come out perfectly every time.
Whether you’re a novice baker or an experienced chef, you’ll find this recipe straightforward and rewarding.
Step 1: Gather Your Ingredients
Before you start baking, it’s crucial to gather all the necessary ingredients.
For gluten-free brownies, you will need gluten-free flour, cocoa powder, sugar, butter, eggs, vanilla extract, and a pinch of salt.
Gluten-free flour blends are readily available at most grocery stores and online, often containing a mix of rice flour, potato starch, and tapioca flour.
Make sure to use unsweetened cocoa powder for the best chocolate flavor.
The quality of your ingredients can significantly impact the final product, so opt for high-quality cocoa powder and pure vanilla extract.
Pre-measuring your ingredients and having them ready will streamline the baking process and help ensure you don’t forget anything.
Step 2: Prepare Your Baking Pan and Preheat the Oven
Properly preparing your baking pan and preheating your oven are essential steps for successful brownies.
Begin by preheating your oven to 350°F (175°C). This temperature is ideal for baking brownies, ensuring they cook evenly without drying out.
While the oven is heating, prepare your baking pan. An 8×8 inch square pan is typically used for brownies, providing the perfect thickness.
Line the pan with parchment paper, leaving some overhang on the sides for easy removal after baking.
Grease the parchment paper lightly with butter or non-stick spray to prevent sticking.
Proper preparation helps ensure your brownies bake evenly and are easy to remove from the pan.
Step 3: Melt the Butter and Mix with Sugar
Melted butter is a key ingredient in creating the perfect brownie texture—rich, dense, and fudgy.
Start by melting the butter in a microwave-safe bowl or a small saucepan over low heat. Once melted, transfer the butter to a large mixing bowl and add the sugar.
Whisk the mixture thoroughly until the sugar is well incorporated, and the mixture is smooth.
This step is crucial as it helps dissolve the sugar, contributing to the brownies’ desired texture.
If the mixture looks grainy, continue whisking until it becomes smoother.
The right combination of butter and sugar sets the foundation for delicious, chewy brownies.
Step 4: Add Eggs and Vanilla Extract
Adding eggs and vanilla extract to your butter and sugar mixture is the next step.
Eggs provide structure and moisture, while vanilla enhances the overall flavor.
Crack the eggs into the bowl one at a time, whisking well after each addition.
This ensures the eggs are fully incorporated and helps create a homogenous mixture.
Once the eggs are mixed in, add the vanilla extract and whisk again. The batter should become smooth and slightly thickened.
The eggs’ proteins will help set the brownies as they bake, giving them their characteristic texture.
Properly incorporating these ingredients is essential for achieving the right consistency in your final product.
Step 5: Incorporate the Dry Ingredients
Now it’s time to add the dry ingredients: gluten-free flour, cocoa powder, and salt.
Sift the flour and cocoa powder into the wet mixture to prevent lumps and ensure even distribution.
Sifting also aerates the dry ingredients, contributing to a lighter texture.
Use a spatula or wooden spoon to gently fold the dry ingredients into the wet mixture.
Be careful not to overmix, as this can result in tough brownies.
Stir just until the dry ingredients are incorporated and the batter is smooth.
Adding the right amount of cocoa powder ensures a rich chocolate flavor, while the flour blend provides structure without the gluten.
Step 6: Bake and Cool
With your batter ready, pour it into the prepared baking pan, spreading it evenly.
Place the pan in the preheated oven and bake for 20-25 minutes.
Baking times can vary, so start checking for doneness around the 20-minute mark.
Insert a toothpick into the center of the brownies; they are done if it comes out with a few moist crumbs but not wet batter.
Avoid overbaking, as this can lead to dry brownies. Once baked, remove the pan from the oven and let it cool on a wire rack.
Allowing the brownies to cool in the pan helps them set properly, making them easier to cut and serve.
Other Stories You May Like


Conclusion
Making gluten-free brownies doesn’t have to be complicated.
By following these six simple steps—gathering your ingredients, preparing your baking pan and oven, melting the butter and mixing with sugar, adding eggs and vanilla extract, incorporating the dry ingredients, and baking and cooling—you can create a delicious, chocolatey treat that everyone can enjoy.
Whether you’re catering to dietary restrictions or simply looking to try something new, this recipe is sure to become a favorite in your baking repertoire.
Enjoy your homemade gluten-free brownies with a glass of milk or a scoop of ice cream for the ultimate indulgence.